
The boat
Klepper Aerius-I assembly procedure
This is how I assemble the Klepper Aerius I:
The procedure is not too difficult if you remember that the general order is from the end to the middle and from the bottom upwards. The only aids I use are a foampad to kneel on, and a small pump, but I can do without either.
Some people sort all parts before starting assembly, I myself don't bother and just grab the parts from the piles that come out of the bags.
Overview
- outside the hull the two frame halves are assembled with everything on them that is outward of the hinges
- insert the frame halves into the skin, join them and tension the hull
- mount the remaining crossribs, chinerods and the coaming
- inflate the sponson
- finish off by mounting the seats, rudder, spraydeck and whatever else you want
In detail
- Frame front half (red markings):
Put aside this assembly.
- Frame rear half (blue markings):
Procedure is very similar, only there are two crossribs. Squeeze both keelbeams towards each other when clipping on crossrib number 6.
The rear chinerods are quite short and attach only to crossrib number 6. Take the two long chinerods with the sliding sleeve and slide the fixed sleeve over the end of the rear chinerod. Snap them into the fittings on crossrib 5. Make sure the screws that secure the sliding sleeve point upwards and inwards, otherwise they might damage the skin in a later stage.
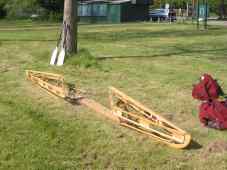
Two frame halves, bow at front
You now have two frame halves with everything attached that is outward of the hinges.
-
Spread the skin on a level piece of ground. Because it is normally folded assymetrically, you should pull it a little until it lies flat with the cockpit hole centered.
A trick you can use on muddy places is to spread out the skin before you start assembling the frame halves, and use it to lay the frame halves on.
-
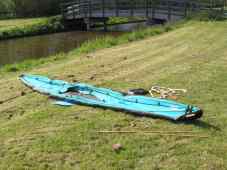
The skin and some loose pieces
Lift up the rear end of the cockpit rim (the straight part) and carefully insert the rear end of the frame all the way. Take care that the extended chinerods also end up inside the skin. Sliding in should go without much force, if not, something might be snagged and may cause damage if you push too hard.
To get the frame halves properly centered, use the strip of hull material that is glued along the bottom as a guide.
Check the position of the deckbar, as it lies loose it might fall out of it's notch.
-
Insert the front half of the frame. Here also try to keep it centered.
-
Lay crossribs 2, 3 and 4 and the two remaining chinerods within reach of the cockpit.
-
Kneel next to the cockpit and push the sleeves of the chinerods over the ends in the bow. (At this moment these are not yet obstructed by crossribs)
-
Move aside the extending ends of the gunwales and lift both keelboard ends. Hook the lip of one end through the loop of the other, they should now be in a __/\__ position, and should be nicely aligned. Push the center gently down, keeping your fingers out of harm's way. It will come back up by itself, so keep pushing it down.
-
Do the same with the gunwales on one side and then on the other. Be extra careful here, these will actually snap in place with some force. This once has cost me a trip when my thumb was caught between the joint.
-
Check the tubes of the sponsons, pull them through the holes in the gunwales. (this can also be done later).
-
Put crossrib 2 in place, first clip it to the keelboard, then to the gunwales (often needing some force) and finally to the deckbar.
-
Do the same with crossrib 4.
-
Finally clip crossrib 3 to the keelboard and then to the gunwales. This will keep the keelboards in place, so you can stop holding these down.
-
Snap the chinerods into their plastic fittings on the crossribs, and slide the sleeves over the opposite end. The screws that secure the sliding sleeves should point away from the skin.
-
Find the rectangular slot in the aluminium end of the front deckbar through the hole in the deck. Take the coaming, find the small stainless steel 'T' underneath the metal mast piece. Keep the coaming perpendicular to the boat, put the T in the slot and rotate the coaming backwards so the T locks in place.
-
Open the fittings at the top of crossrib 3, feed the T's in the middle of the coaming throught the holes in the deck and lay them in the slots at the top of the rib's fitting. Close the fittings again.
-
Take one rear end of the coaming, pull it inward (like tensioning a bow) and hook it to the aluminium part at the top of crossrib 4. Do the same with the other end.
-
Check if nothing is snagged between the coaming and the deck.
-
From the middle, tuck each seam into the groove on top of the coaming. Make sure the T's at the end go neatly through their holes.
-
Take the rear end of the cockpit (called boomerang, for obvious reasons), hold it with the four screws pointing forward and hang the deck on the screws. Insert the boomerang carefully in the slots on either side of the coaming.
-
Inflating the sponsons
There are two rectangular hooks on the inside of the deck underneat the D-rings near the front of the cockpit. These transfer the forces from the stays to the frame when sailing. Hook them into the upper beam on each gunwale.
This also gives some indication of how well the frame is centered in the hull, when the sponsons are inflated both should cause an equally shallow indentation. If not, the boat is not straight and does not paddle as well as it should.
If you suspect the skin is not centered, it might help to lift the boat and shake it before the sponsons are inflated.
-
Inflate the sponsons on both sides. It is best to do first one side only half, then the other side, and then complete the first half. Keep an eye on the seam in the center of the foredeck, it should end up straight and centered on top of the deck bar.
You can inflate by mouth or by small handpump, as long as you don't exceed the maximum pressure of 20kPa (0.2 bar or about 3 psi). Don't use compressors.
I use a small double-action balloon pump which works quite well.
almost finished
-
Click the seat to the keelboard, be careful to insert the aluminium lip in it's hole as well.
-
Turn the caps on either end of the backrest bar so that a slot appears. Slide the backrest with the Klepper logo right side up over the T's at the rear of the coaming and turn the caps to close them.
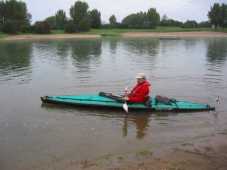
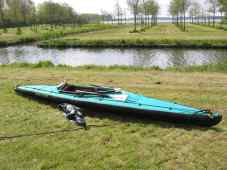
it floats!
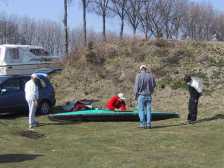
That's about it. This will normally take me about 15 minutes, or 20 if I take it easy or when lecturing bystanders. Normally I also drop in my homemade footrest (a slotted plastic drainpipe that slides inside over crossrib 2), mount my spraydeck, towrope and a few other minor items.
Disassembly and packing
In principle disassembly is the reverse order of assembly, only even faster. Normally I take my time though, so the boat can dry a little before I pack the bags. I usually leave the boat in it's bags when storing it at home, even when a little damp when packing does not seem to harm the hull. After all the bags are made of canvas and will allow watervapour to pass through. When there's no opportunity to let the boat dry a little before packing I will unpack it at home and lay it out to dry.
I've made an animation of the disassembly sequence, it consist of 20 photos taken at 30 second intervals. It's about 1 Megabyte in size, to see it, click here, it will open in a new window.
To minimize risk of damage you can do the following:
-
You should take some extra care not to snag the extended chinerods when pulling the rear frame from the skin.
-
When packing, put the least vulnerable ends of the long parts downwards in the bag. Usually these are the hinges or blunt ends of the chine rods. Pull the straps around the bag as tight as possible, so the parts don't move against each other.
The previous owner of my Quattro had bought lots of extra bags (originally intended to store fishing rods) to store all frame items separately. I still use a few for the chinerods, coaming and paddles, and have reused some for my singleseater.
-
Fold the skin by pulling one side lengthwise half over the other, so the bow and stern fall flat and only a narrow strip of deck canvas is still exposed. Fold both ends towards the middle, leaving a gap of about 10cm (4") between them, fold both ends in again and finally fold the whole pack double. You should now have an almost square pack with the hull on the outside which fits nicely in the hullbag. You can also stuff the seat and backrest into this bag, with the hard parts pointing away from the skin.
Twoseater
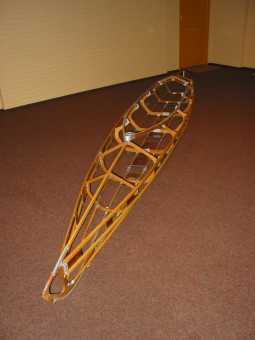
The twoseater frame assembled first time in the hall of my appartment.
I have assisted and watched twoseaters being assembled, and in spring 2003 I was given an old twoseater frame without a skin. The boat itself is from 1955 and has been paddled until the skin leaked beyond repair in about 1990. My first assembly of this frame went surprisingly well, and I initially intended to repair what's necessary and get a new skin for it. After some expert advice I found out that I would need to replace and repair a lot more than I thought, and that all this might end up to be more expensive that a younger and better second hand boat. I've passed it on to the next owner, who intends to make a bookcase out of it for his collection of paddlebooks.
About one year later, I've acquired a reasonably young Aerius Quattro, which I managed to assemble first time in about 20 minutes. Some of this time was due to the fact that the previous owner had packed all frame parts in separate protective bags and sleeves.
The main differences in assembling a twoseater are:
-
On both front and rear two crossribs are attached when building the frame halves. This makes sense if you remember that everything outside of the hinges needs to be assembled before the frame is inserted into the skin.
-
Deckbars are one piece each and also clip to a crossrib.
-
The three cockpit crossribs are inserted rear first, then front, then center.
-
The chinerods are inserted so that the sliding sleeve is at the rear end of the cockpit. (i.e. 1-2-3=4, as opposed to 1-2=3-4 for a single seater)
-
The coaming consists of four pieces. On modern boats these are permanently connected with hinges, in my boat the rear ends are separate and need to be inserted in sleeves.
-
Of course there are two seats
Because the boat parts are bent more gently than in a singleseater they go together more easily, and I guess it will take about the same time to assemble either boat. The only disadvantage you might have is that a twoseater requires a rudder more often, which takes some extra assembly time.

last change: August 10, 2004